A bare element commonly runs about $30-80, while a sealed heater assembly with built-in sensors costs more, and you should always verify current prices for your exact part number. That is the retail range for the part a diagnosis already pointed you to. A technician's invoice for the same repair usually lands somewhere between $200 and $2,000, depending on the heater type and wattage involved. If you have already worked through why the tub stopped heating or why it keeps tripping the breaker and the verdict came back "dead element," this page picks up exactly there: what the money buys, what "replace the assembly" actually means, and where the honest line sits between a weekend job and a call you should make.
Where this page starts, and what it does not cover
This is not a diagnostic guide. If you have not already confirmed the heater itself is the problem, rather than a low-flow fault, a tripped high-limit switch, or a dirty filter starving the pump, stop here and work through the fault first. A Balboa or Gecko control board that throws a flow-related code is telling you the heater never even got permission to fire, and swapping the element will not fix that. Those checks live in the flow and heating troubleshooting guides, not here. This page assumes you already have a verdict: the element itself has failed, usually confirmed by an open circuit on a multimeter or a heater that never draws current even when everything upstream checks out.
What you are actually paying for: the part

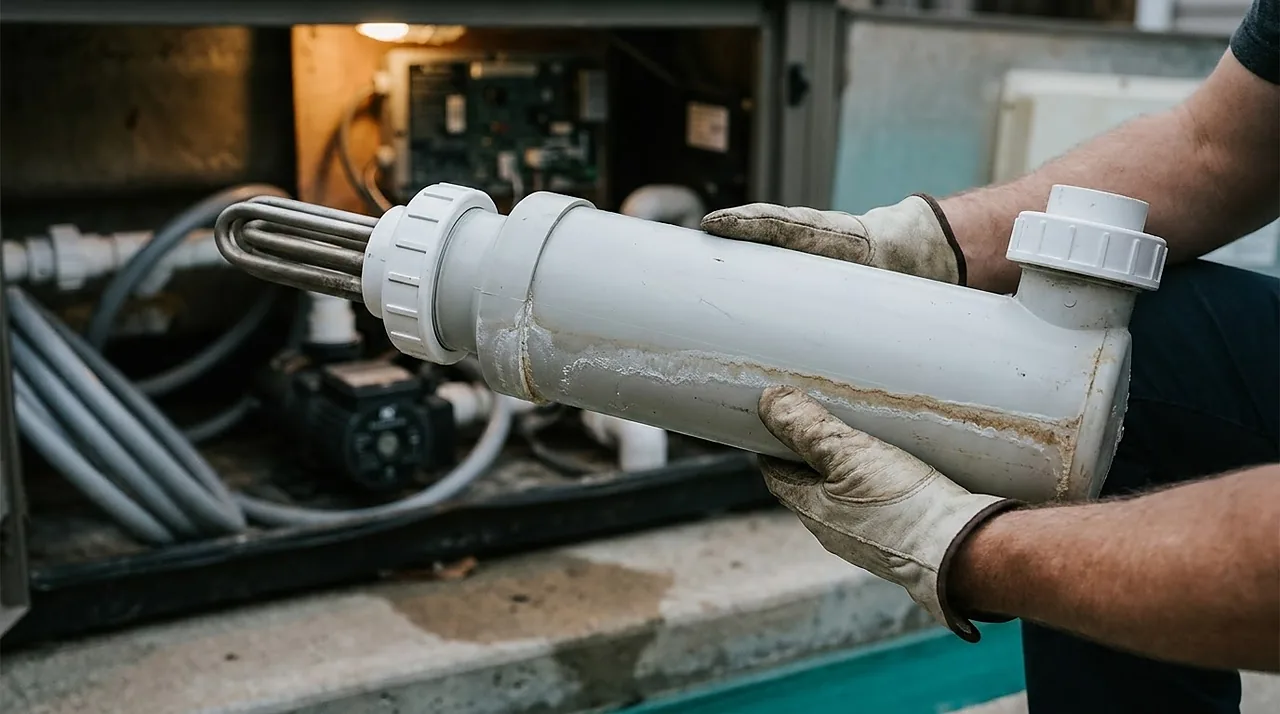
Spa heaters come in two basic shapes. Older and some budget systems use a straight tube heater: a stainless or titanium sheath running down the middle of a PVC pipe, with the electrical element wired directly and the whole thing serviceable as bare parts. Most mid-2010s-and-newer systems, including common Balboa and Gecko-controlled packs, use a molded heater assembly: the element, the pressure and flow switches, and sometimes the high-limit sensor all built into one sealed manifold. You do not buy "the coil" separately on those. You buy the whole assembly.
That is the practical answer to what "replace the assembly" means, and it is also why the price range is wide. A bare element commonly runs about $30-80, while a sealed heater assembly with built-in sensors costs more. Either way, the part itself is modest relative to the labor conversation that follows. Retailers such as SpaDepot list elements and assemblies across that span, so the specific part number and brand fit matter more than any single "typical" figure. Prices move, so check the current price for your exact part number before ordering.
What a service call actually buys

A $200 to $2,000 invoice is rarely just "installing a replacement part." Break it down and four things are usually in there:
- Trip or diagnostic fee
- Typical range: $50-150. What it covers: The technician showing up, confirming the fault is really the element and not a flow or control-board issue, and quoting the job.
- Labor
- Typical range: $300-800. What it covers: Draining down the heater loop, unthreading unions, seating new O-rings, refilling, bleeding air, and confirming the fault clears; higher on gas-fired or higher-wattage systems.
- Part markup
- Typical range: $50-400. What it covers: The wholesale part (a bare element commonly runs about $30-80, while a sealed heater assembly with built-in sensors costs more), marked up and often warrantied by the shop for a defined period; the higher end usually reflects a sealed, sensor-integrated, brand-locked assembly rather than a bare element.
- Typical total
- Typical range: $350-2,000. What it covers: Trip fee plus labor plus marked-up part on a standard electric heater at the low end, climbing toward gas-heater or high-wattage territory at the high end.
Add the first three lines for an ordinary electric heater swap and the low end of that total is arithmetic, not padding. A shop charging near the bottom is usually skipping or waiving the trip fee for an existing customer and working on a simple electric element; the climb toward the $2,000 ceiling belongs to gas-fired heaters, higher-wattage packs, and brand-locked sealed assemblies, where both the part and the labor run well above the standard-electric figures in this table. Independent cost guides such as Prime Pool Market and Angi's 2026 repair-cost data both place professional labor alone in the $300-800 band on its own, before the part is even added. That labor number tracks closely with what a routine hot tub service call runs once a trip fee and diagnostic time are folded in.
The honest DIY difficulty line

Here is the split that actually matters, and it runs right down the middle of the job. Disconnecting a 240V circuit is not a DIY step. A hard-wired spa is fed by a dedicated GFCI-protected disconnect, required by electrical code to sit within sight of the tub and no closer than 5 feet to it, specifically so someone can kill power at a glance before working on the equipment. Confirming that disconnect is actually open, and any deeper work at the panel or on the wiring itself, belongs to a licensed electrician. Getting that wrong at 240V is where a mistake stops being an inconvenience and starts being dangerous.
The swap itself, once power is confirmed off and the disconnect is locked open, is a different kind of job. It is unions and O-rings: two large plastic union nuts holding the heater in line with the plumbing, a drain-down to get below the heater's height, the old assembly coming out, a new O-ring seated on each union face, the new assembly going back in hand-tight plus a quarter turn, then a refill, a bleed of trapped air at the union, and a test cycle to confirm the fault clears and nothing weeps at the joints. Someone comfortable with basic plumbing unions, patient about not over-tightening PVC threads, and willing to actually verify the disconnect is open before touching anything can do that part of the job themselves. The instructions, with torque notes and the specific order that avoids trapping an airlock, live in the step-by-step heater element swap; this page is about whether to pick up the wrench at all.
DIY or call it in: a working decision table
- Warranty status
- Lean DIY: Tub is well out of warranty. Lean professional: Tub or heater is still under warranty; a DIY swap can void it.
- Comfort with the disconnect
- Lean DIY: You can locate and confirm the GFCI disconnect is open without guessing. Lean professional: You are unsure where the disconnect is, or the panel work needed is beyond a simple flip.
- Access to the heater
- Lean DIY: Equipment bay is roomy, unions are reachable by hand. Lean professional: Heater is wedged in a tight cabinet or plumbed in an unusual order.
- Confirmed diagnosis
- Lean DIY: Already ruled out flow and control-board faults elsewhere. Lean professional: Still uncertain whether it is the element or something upstream.
- Time versus cost
- Lean DIY: An afternoon is worth more to you than $300-800 in saved labor. Lean professional: You would rather pay for a same-week fix and a workmanship warranty.
Neither column is the "right" answer. A shop's labor charge also buys a workmanship warranty on that specific repair, something a DIY swap does not come with. If the heater fails again in three weeks, a paid installer usually comes back at no charge; a DIY repeat failure is back on you to diagnose from scratch.
A quick gut check before you buy the part
Before ordering an element or assembly, confirm three things so the money is not wasted: the fault code or symptom genuinely points to the heater and not a flow restriction, the replacement part matches your control system's exact heater connector and wattage (not just "fits the same brand"), and the disconnect you plan to use is the real 240V feed, not just the topside control panel's soft power button. A bare element commonly runs about $30-80, while a sealed heater assembly with built-in sensors costs more, and you should always verify current prices for your exact part number. A soft "off" on the topside does not de-energize the heater circuit.
Is it worth fixing, and how long should a heater last?
A heater swap is usually worth it on a tub whose shell, cover and pump are in decent shape, since it costs far less than a replacement tub. It becomes a harder call on an old tub that is also showing a failing pump, a cracked shell or a tired control board, where repair bills stack up. Many heaters last for years, and the usual life-shorteners are scale from high calcium hardness, corrosion from long stretches of low pH, and running dry on low flow. Keeping water balanced and the filter clean is the cheapest heater insurance. Once the replacement is complete and the water is refilled, check how long heat-up takes from cold.
Frequently asked questions
Can I just buy a cheaper universal heater element instead of the brand-matched assembly?
Sometimes, on older tube-style heaters with a separately serviceable element. On newer sealed assemblies with built-in flow and high-limit sensors, a mismatched part can fail to communicate with the control board correctly, so match the exact assembly part number rather than shopping by wattage alone.
Does a bad heater element explain a tripped breaker too?
Often, yes. A failing element that develops a ground fault is one of the more common reasons a spa's GFCI breaker trips repeatedly, and it is worth ruling out alongside the pump. The full breaker-tripping walkthrough covers that overlap in more depth.
If I install the part myself, does the part's own warranty still cover it?
Usually yes, but check before you buy. Most heater elements and sealed assemblies carry a manufacturer warranty on the part itself regardless of who installs it, separate from any workmanship warranty a shop would add on top for its own labor. What a self-install typically forfeits is that workmanship coverage, plus, on a tub still under its overall system warranty, possibly the tub manufacturer's warranty on related components if the fine print requires a licensed installer. Read the specific warranty terms for your part and your tub before deciding, not just the general rule.
How long does a heater replacement actually take?
Once the fault is confirmed, the physical swap usually runs 45 minutes to two hours, including drain-down and refill. Add diagnostic time if the technician has not already confirmed the fault on a prior visit.